Getting started with the AWS Command-Line Interface
10 October 2019In this tutorial you’ll install the AWS command line interface and learn how to set up an IAM user with programmatic access to AWS resources. This tutorial assumes you have basic command-line knowledge on either Mac or a unix-like operating system.
Installing the AWS CLI (Command-Line Interface)
Make sure you have python and pip installed. pip is a tool for installing python packages. You can check that you have them installed using these commands.
$ python --version
Python 2.7.16

$ pip --version
pip 19.1.1 from /usr/local/lib/python2.7/site-packages/pip (python 2.7)
Next install the awscli package. Note that your output may look different from mine.
$ pip install --user awscli
DEPRECATION: Python 2.7 will reach the end of its life on January 1st, 2020. Please upgrade your Python as Python 2.7 won't be maintained after that date. A future version of pip will drop support for Python 2.7.
Requirement already satisfied: awscli in /usr/local/lib/python2.7/site-packages (1.16.72)
Requirement already satisfied: docutils>=0.10 in /usr/local/lib/python2.7/site-packages (from awscli) (0.14)
Requirement already satisfied: botocore==1.12.62 in /usr/local/lib/python2.7/site-packages (from awscli) (1.12.62)
Requirement already satisfied: PyYAML<=3.13,>=3.10 in /usr/local/lib/python2.7/site-packages (from awscli) (3.13)
Requirement already satisfied: s3transfer<0.2.0,>=0.1.12 in /usr/local/lib/python2.7/site-packages (from awscli) (0.1.13)
Requirement already satisfied: rsa<=3.5.0,>=3.1.2 in /usr/local/lib/python2.7/site-packages (from awscli) (3.4.2)
Requirement already satisfied: colorama<=0.3.9,>=0.2.5 in /usr/local/lib/python2.7/site-packages (from awscli) (0.3.9)
Requirement already satisfied: urllib3<1.25,>=1.20; python_version == "2.7" in /usr/local/lib/python2.7/site-packages (from botocore==1.12.62->awscli) (1.24.1)
Requirement already satisfied: jmespath<1.0.0,>=0.7.1 in /usr/local/lib/python2.7/site-packages (from botocore==1.12.62->awscli) (0.9.3)
Requirement already satisfied: python-dateutil<3.0.0,>=2.1; python_version >= "2.7" in /usr/local/lib/python2.7/site-packages (from botocore==1.12.62->awscli) (2.7.5)
Requirement already satisfied: futures<4.0.0,>=2.2.0; python_version == "2.6" or python_version == "2.7" in /usr/local/lib/python2.7/site-packages (from s3transfer<0.2.0,>=0.1.12->awscli) (3.2.0)
Requirement already satisfied: pyasn1>=0.1.3 in /usr/local/lib/python2.7/site-packages (from rsa<=3.5.0,>=3.1.2->awscli) (0.4.4)
Requirement already satisfied: six>=1.5 in /usr/local/lib/python2.7/site-packages (from python-dateutil<3.0.0,>=2.1; python_version >= "2.7"->botocore==1.12.62->awscli) (1.10.0)
Verify that the awscli tool was successfully installed.
$ aws --version
aws-cli/1.16.72 Python/2.7.16 Darwin/17.7.0 botocore/1.12.62
In order to make use of the awscli tool, you will need programmatic access keys that allow the awscli to talk to the Amazon Web Services API. API stands for Application Program Interface and Web APIs in particular have become a standard practice for enabling programmatic interaction with web services.
What is an IAM User?
In this next section, you’re going to create an IAM User from the AWS Console. IAM stands for Identity and Access Management and it is used extensively in AWS to allow or deny permission to resources and services.
When you first create an AWS account, you can only login as the AWS Account Root User. This user has the permission to do anything and everything in your account. If you create access keys for the root user and the keys are compromised, there is no limit to what a malicious actor can do in your account, and you could wake up one morning to an AWS bill for tens of thousands of dollars.
It’s generally recommended to create another user or set of users with limited access, while keeping the root account credentials securely locked away. However, since IAM is beyond the scope of this tutorial, we’ll be creating a user with very permissive access for the sake of convenience. Please note this is only a slight improvement from using the root account directly and is not very secure nor recommended for a production setup.
Create the IAM User
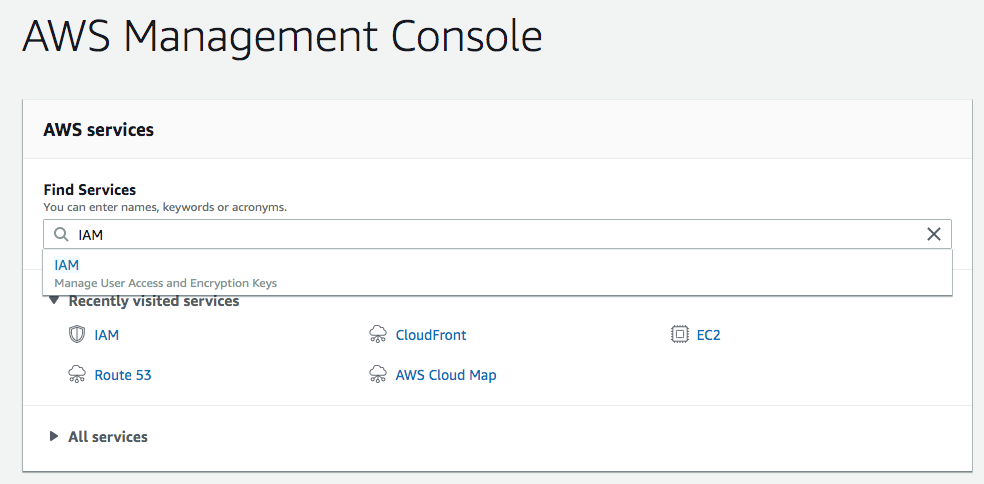
Log in to the AWS console and search for the IAM service.
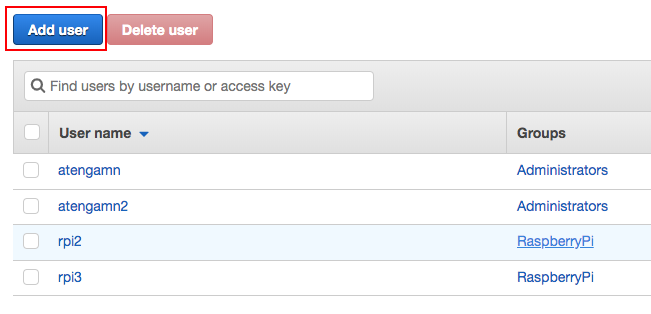
Click on the Users link.
Click on the Add user button.
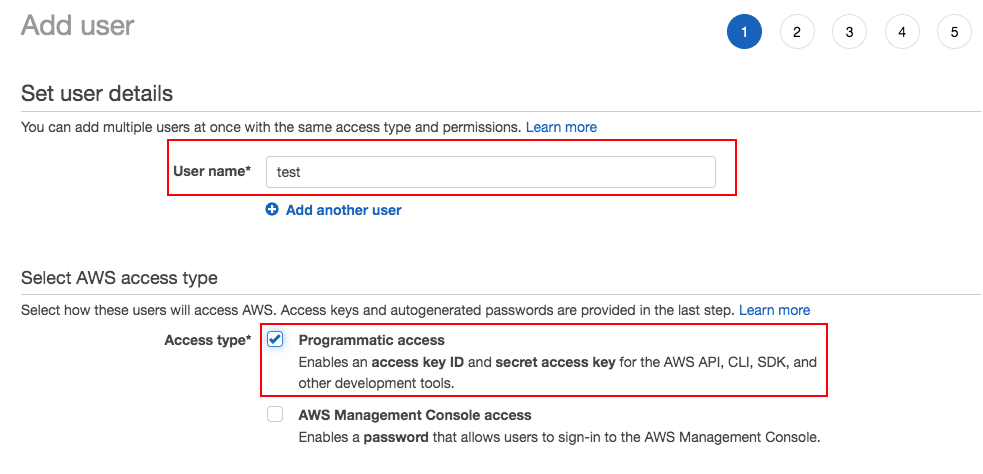
Fill in the username and make sure to check Programmatic access. Click Next: Permissions.
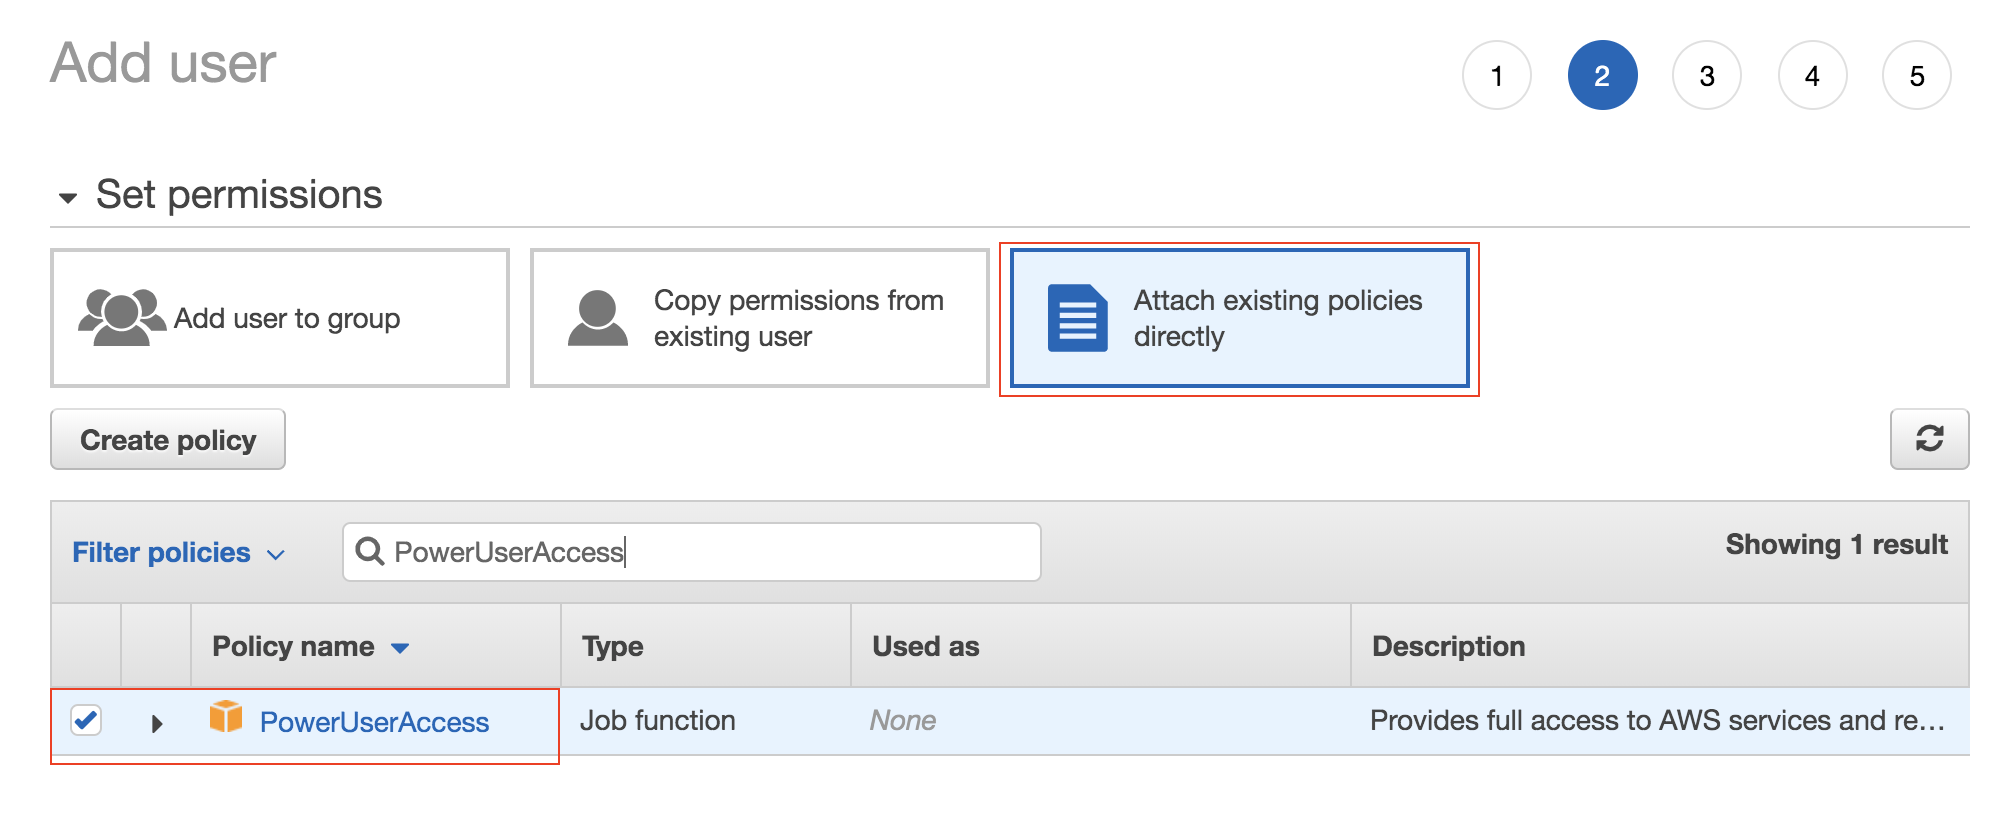
Click on Attach existing policies directly and search for PowerUserAccess. Select the policy and click Next: Tags.
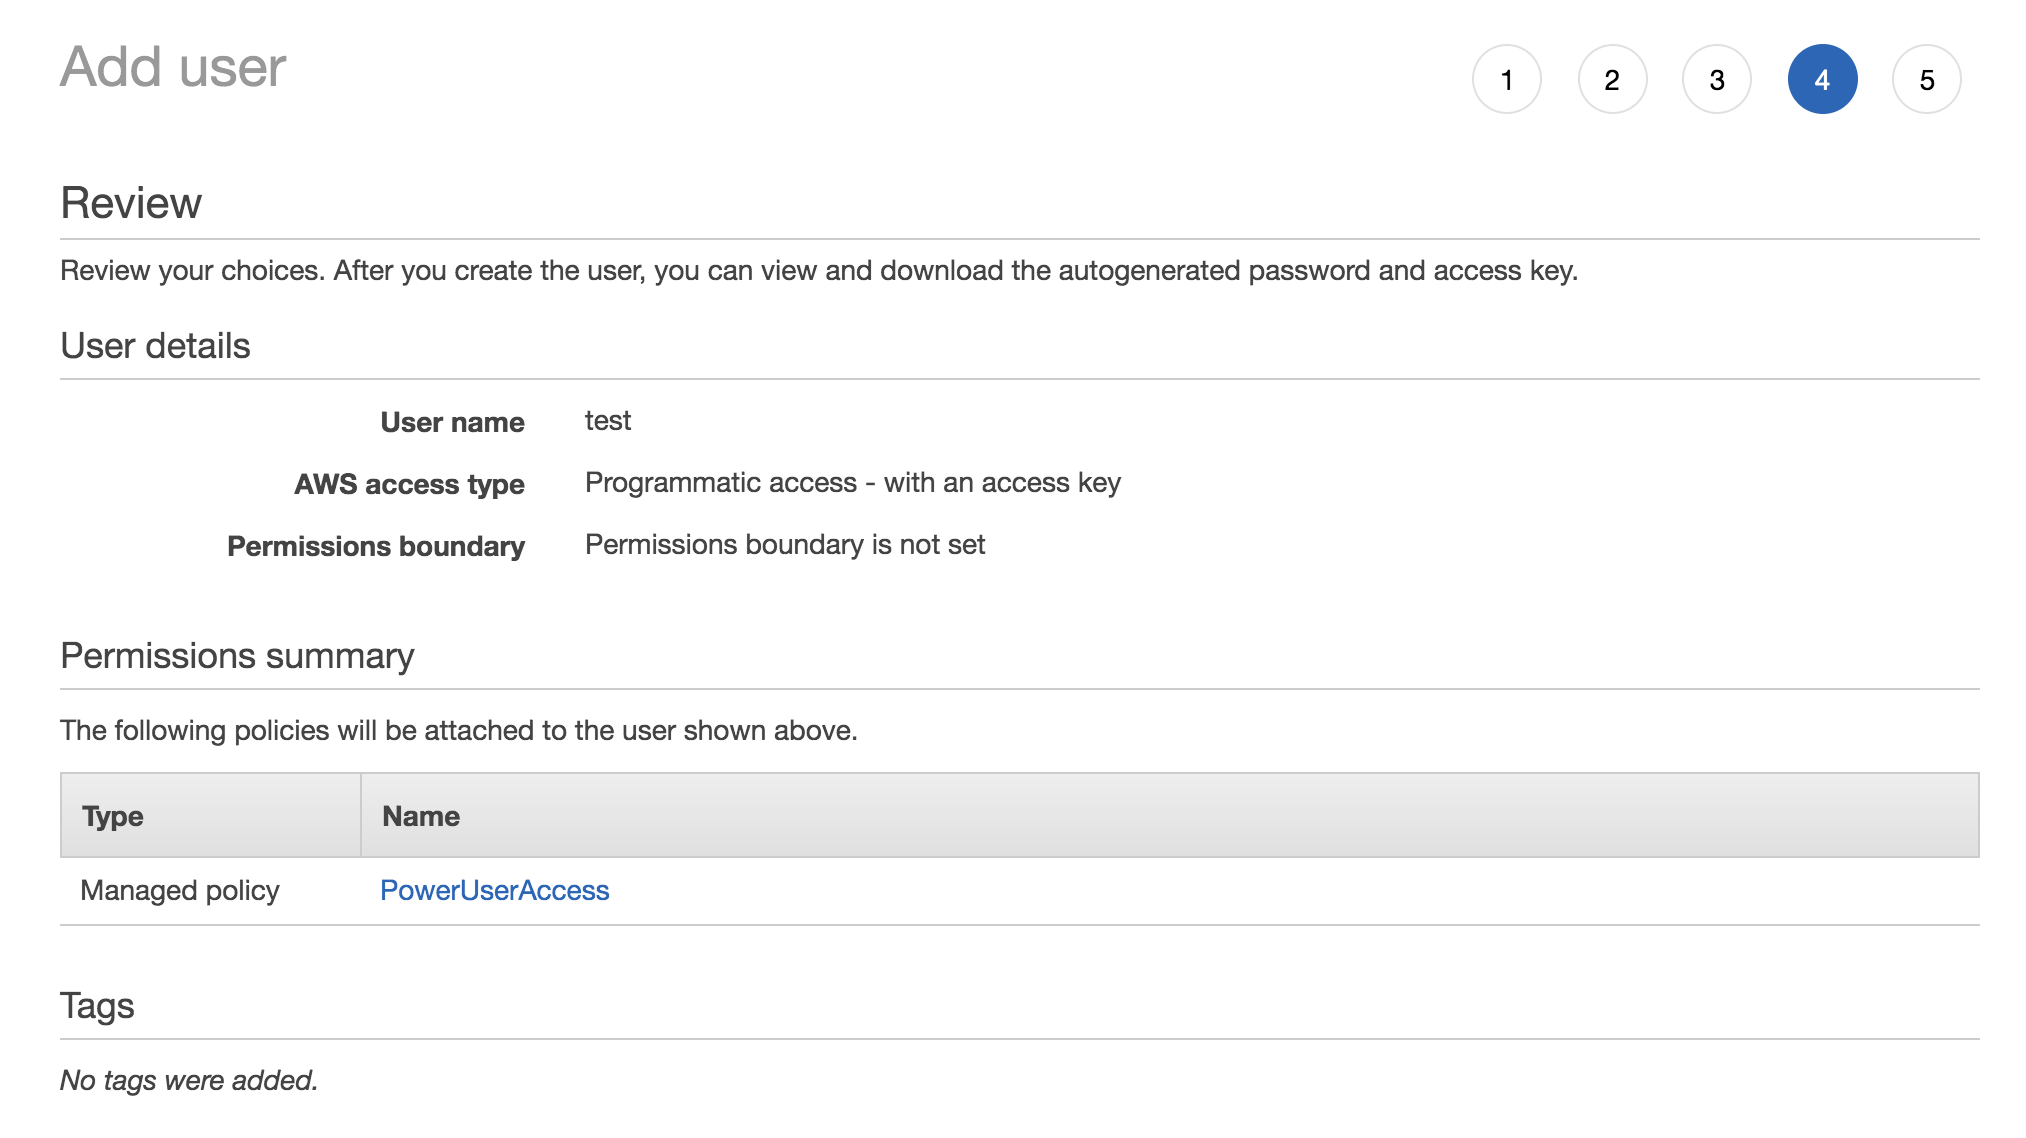
Skip the tags section and click Next: Review. The summary should look something like this.
The next page shows that IAM User creation was successful. The Access Key ID will be displayed, but you will have to click Show to display the Secret access key. You will need to take note of both of these keys for CLI access.

Note that for security reasons, you will not be able to look up the secret access key after this point. If you end up losing access to your secret access key, you will have to create a new set of access keys, but not necessarily a new user.
Update the CLI to use access keys
Run the aws configure command which will prompt you for the access and secret key.
$ aws configure
AWS Access Key ID [****************MBAQ]:
AWS Secret Access Key [****************1H4e]:
Default region name [us-east-1]:
Default output format [None]:
You can leave the defaults for region and output when prompted. Your output may look different from mine since I already have default credentials configured.
This command creates two files ~/.aws/credentials, ~/.aws/config if they do not exist, and updates their contents with the information provided. You can update or create these files by hand rather than using the aws configure command.
The awscli tool should now be configured to use the default profile which is associated with the new access keys.
Try running the aws sts get-caller-identity command.
$ aws sts get-caller-identity
{
    "Account": "xxxx",
    "UserId": "AIDA5IXRS7JVGTIATEOOB",
    "Arn": "arn:aws:iam::xxxx:user/test"
}
This command simply returns the caller’s identity and you can see the “test” username present in the Arn field.
Getting to know the AWS CLI
The syntax for awscli commands looks like aws <command> <subcommand> <arguments>. The command is usally the name of an AWS service like s3, ec2, iam, etc. The subcommand is usually an action associated with that service, for example ec2 start-instances or iam create-user.
To get a list of available services you can run aws help. To get a list of available actions for a particular service you can run aws <command> help, e.g. aws ec2 help.
Let’s try creating an S3 Bucket from the command-line. S3 stands for Simple Storage Service, and it is Amazon’s blob storage service for uploading and downloading arbitrary files. The command for creating a bucket is aws s3 mb. To know what arguments this command takes, we should run
$ aws s3 mb help
This returns a man-pages style document which tells us everything we need to know about the aws s3 mb command.
MB()                                                                      MB()


NAME
       mb -

DESCRIPTION
       Creates an S3 bucket.

       See 'aws help' for descriptions of global parameters.

SYNOPSIS
            mb
          <S3Uri>

OPTIONS
       path (string)

       See 'aws help' for descriptions of global parameters.

EXAMPLES
       The  following  mb command creates a bucket.  In this example, the user
       makes the bucket mybucket.  The bucket is created in the region  speci-
       fied in the user's configuration file:

          aws s3 mb s3://mybucket

       Output:
...skipping...
OPTIONS
       path (string)

       See 'aws help' for descriptions of global parameters.

EXAMPLES
       The  following  mb command creates a bucket.  In this example, the user
       makes the bucket mybucket.  The bucket is created in the region  speci-
       fied in the user's configuration file:

          aws s3 mb s3://mybucket

       Output:

          make_bucket: s3://mybucket

       The  following mb command creates a bucket in a region specified by the
       --region parameter.   In  this  example,  the  user  makes  the  bucket
       mybucket in the region us-west-1:

          aws s3 mb s3://mybucket --region us-west-1

       Output:

          make_bucket: s3://mybucket


                                                                          MB()
So looking at the examples, we can see that in order to create a bucket named “mybucket” we should run the command aws s3 mb s3://mybucket.
$ aws s3 mb s3://test-9187263
make_bucket: test-9187263
In this example we created an S3 bucket named test-9187263. Amazon requires S3 bucket names to be globally unique across all of AWS, similar to domain names on the internet. So if you tried to make a bucket named “mybucket” you probably ran into a BucketAlreadyExists error.
We can delete the bucket using the aws s3 rb command. This command accepts a single argument which, like the make-bucket command, is the S3Uri. If you weren’t sure about the syntax of the command you could have run aws s3 rb help to see usage documentation and examples.
$ aws s3 rb s3://test-9187263
remove_bucket: test-9187263
Summary
-
You created an IAM User with programmatic access and attached the PowerUserAccess policy to the new user. This gives the user permission to access most AWS services and perform most actions, and in general is not recommended for security purposes.
-
You noted the Access Key ID and Secret access key for the new user and configured the
awsclitool to use these access keys. -
You learned about the syntax of the
awsclitool, and how to get more information about a specificawsclicommand. -
You created an S3 bucket and deleted the same S3 bucket.